
Previously, I had been using Middleman to power my personal website. I had also been using Ghost to run a separate blog which has now been merged into this one as of October 2021.
Middleman wasn’t the fastest but it was written in Ruby. Thus, I reasoned that I could modify it as I pleased when I needed to. Of course, that time never came and each time I returned to the blog after a few months absence something else seemed broken or slow. I didn’t want this kind of maintenance for an application that mostly generated HTML from Markdown files.
So I looked around for something new. I’d already heard of Hugo, and I’ve been playing with Go a lot recently, so I decided to give it a shot.
I followed the Quick Start guide. As Go applications compile to binary installation was a very easy brew install hugo with no complicated dependencies to resolve/explode.
Following that, every command executed so quickly I assumed that an error had occurred. I’m not joking. The basic commands were more than enough to get going and felt easy to remember. Starting the local server was instant and navigating the site locally was very snappy, as it should be. I was sold.
Migrating blog posts
I didn’t try any kind of automated blog post migration as:
- There weren’t very many posts in the first place and
- They were already written in Markdown, meaning that it was mostly a copy and paste job.
This is why you should always write in Markdown!
CSS theme overrides
After the initial setup and picking a theme I liked, I wanted to know how to override CSS, as my theme had some issues rendering links in paragraphs. I wanted to do this in a way that kept the changes separate from the original theme CSS, to ensure it was future-proof.
All that was required here was to add the rules to a new file in /static/css:
p a {
  text-decoration: underline;
  margin-right: 0 !important;
}
Tell Hugo that this file exists, in config.yaml:
params:
  custom_css: ["css/custom.css"]
And finally update the head.html of my theme to include:
{{ range .Site.Params.custom_css -}}
	<link rel="stylesheet" href="{{ . | absURL }}">
{{- end }}
This solution was inspired by this forum post, amongst others.
Image management
Resizing and optimising images is without a doubt my least favourite part of blogging. Blogs with snazzy WYSIWYG editors will usually do some part of this for you: drag and drop an image and it will upload it, optimise it and add it to the post. They mostly do a good job.
However, if you’re using a static site generator on localhost, you lose this kind of functionality, meaning you have to manually optimise, compress and resize images yourself.
Fortunately, Hugo shines here with its built-in image processing. While it promises a lot of features, I did find it difficult to get set up. Did I need to define all images as Page Resources? Did images have to live in /static? The answers were not clear and examples seemed scarce.
In the end, I added my own shortcode to /layouts/shortcodes/img.html:
{{ $img := $.Page.Resources.GetMatch (.Get "src")}}
{{ $smaller := $img.Resize (.Get "size") }}
<div class="img-container">
	<figure>
		<img src="{{ $smaller.RelPermalink }}" alt="{{ (.Get "title") }}" />
		<figcaption>{{ (.Get "title") }}</figcaption>
	</figure>
</div>
Now, when I want to add an image to a blog, I can drop it into the images folder within the parent blog post folder. Here’s what the hierarchy looks like:
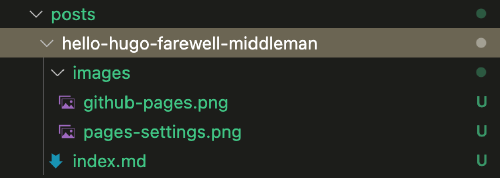
And the code itself that I write to include an image:
{{< img src="images/folder-structure.png" size="500x" title="Hugo folder structure for images" >}}
I don’t specifically set quality, as it seems to be done by default on resize, but you could also feed that into the shortcode.
The result is that I can drop bigger images straight into the folder, set the size in the shortcode, and the optimisation and sizing will be done for me on build!
Deploying to GitHub Pages
Up until now, I’d hosted my blog on my own VPS, but I wanted to try out GitHub Pages to offload some of the overhead and enable automatic builds after a git push. Fortunately, GitHub Pages has some very generous usage quotas:
GitHub Pages source repositories have a recommended limit of 1GB…
Published GitHub Pages sites may be no larger than 1 GB.
GitHub Pages sites have a soft bandwidth limit of 100GB per month.
GitHub Pages sites have a soft limit of 10 builds per hour.
To automate the build after you’ve pushed changes, you need to add a GitHub action. That’s all covered in this guide. I hit a few snags getting this working, mostly self-inflicted:
- I did not name my GitHub repo correctly, which is the first thing they tell you to do in the guide. You won’t get nice errors, it just won’t work!
- I’d edited my theme locally but hadn’t created my own public repo for the theme, which is required for the build process.
- Finally, I had to switch my Pages build branch to
gh-pages, notmain. This wasn’t mentioned in the above guide.
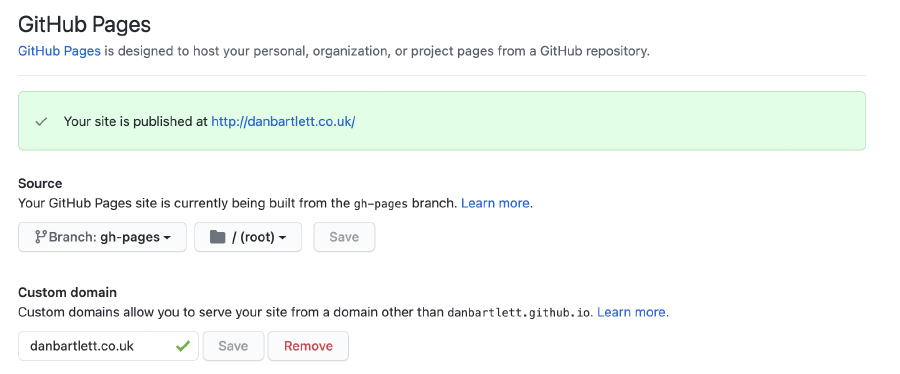
After that, I also added my existing domain as a custom domain, which was very easy… until that also broke and I received “Site not found” errors on new deploys. After some head-scratching, I realised I hadn’t added a CNAME file to the root folder (or for Hugo, in static), which GitHub requires.
I didn’t fiddle with the HTTPS setup in GitHub as this domain is managed by CloudFlare, so enabling HTTPS was just a case of clicking a toggle.
This is what the Pages setup looked like in the end:
Now all I have to do when I add something new is commit the changes and git push! It’s a developers dream.
The repo for this site is public, so you can view it all here on GitHub.
Final tweaks
I also used this fresh start as an opportunity to remove all tracking from this website: I don’t need it and you don’t want it. You are free and unencumbered!
Hugo does not come with a default .gitignore, so you might see built HTML files sneaking their way into your commits. To prevent this, just add the following to a .gitignore:
/public/
/resources/_gen/
Finally, I also realised that I broke my Keybase proof. This was easy enough to replace: just paste the text provided by Keybase into /static/keybase.txt and voila! You are validated again.
Hey you.
Interested in inner work, wisdom and learning?